By every meaningful measure, the internet is now the same.

Author: sarah

Sarah’s Seitan Sausage

This is my standard, versatile fake meat. It is almost exactly the same as this recipe for seitan pastrami but quadrupled and tweaked slightly.

It makes 4 big sausages that you can freeze and use over a few months. It’s great in pasta sauce, fried up as taco meat, sliced and spread on a pizza like pepperoni, or diced and tossed in a salad.   32-40 servings

Preheat oven to 325 degrees

Ingredients

    • 6 cups instant gluten flour (vital wheat gluten) (order in bulk online)
    • 1 cup nutritional yeast flakes
    • 1 cup garbanzo flour (this is optional – you could also use whole wheat flour, soy flour or any other random flour you want to use up)
    • 2 Tablespoons + 2 teaspoons paprika (or if that’s too complicated, just use your 1/4 cup and fill it 2/3 of the way.)
    • 1 Tablespoon salt
    • 1 teaspoon ground cinnamon
    • 1 teaspoon ground cumin
    • 1 teaspoon ground mustard (a squirt of wet mustard works fine too, but in that case add with wet
    • ingredients)
    • 2 teaspoons ground black pepper
    • 1/2 teaspoon cayenne pepper
    • 1/2 teaspoon ground allspice
    • 2 1/2 cups cold water
    • 1 cup tomato paste (if you don’t have it you can sub ketchup for a sweeter sausage)
    • 1/2 cup soy sauce
    • 1 cup olive oil (or any flavorless oil, such as canola)
    • 12 cloves garlic, pressed (if this sounds like a pain, just toss in 2 T of garlic powder but add with dry ingredients)

Mix the dry ingredients (flours, yeast flakes and spices) with a fork in a large mixing bowl. Stir the liquid ingredients together in a medium mixing bowl. Pour theliquid into the dry ingredients, and mix them thoroughly. You will have to get in there with your bare hands and knead. If there is still flour around the edges, addwater a few tablespoons at a time until you have one big gluey dough ball.

Knead the gluten directly in the mixing bowl for about a minute. Pull it apart into 4 chunks (you can use a scale to make them of even weight.) Form the gluten into four sausages, each about 8 inches long. Cut 4 pieces of parchment paper and 4 pieces of foil, and wrap each sausage tightly in parchment paper then foil the ends and place the sausage seam side down onto a dry cookie sheet. Nestle all 4 sausages so they are touching on the sheet and put in the oven.

Bake the sausage for 1 1/2 hours at 325. When done, unwrap the seitan, transfer it to a cooling rack, and let it cool thoroughly. When completely cool, wrap the seitan tightly in plastic wrap and store in the freezer (for a few months) or the fridge (for a week or so). I like to keep one in the fridge and the rest in the freezer and I thaw them out as needed.
Sarah’s Flamenco Show in May 2012

I have been taking flamenco dance lessons for the past 3 years, building slowly from once a week dabbling at the Old Town School of Folk Music to 4 classes a week with Chiara Mangiameli at her studio in Logan Square. It’s a formidable dance style to study, especially for someone like me who didn’t have any dance training going into it. But I love that it is graceful, forceful, emotional and athletic all at once, and works for me as both exercise and artistic expression. As a bonus, sometimes I get to perform! The next show I’ll be dancing in is called “A Traves del Espejo” and it will be at the Adventure Stage Chicago (formerly known as the Vittum Theater) Friday May 18th and 19th at 8pm and Sunday May 20th at 4pm. I’ll be dancing in two of the pieces, and in addition to the ensemble work I’m sure there will be at least two solos by professional dancers, and the music is always live, authentic flamenco music. Below is the link to more info and a video trailer for the show:

http://www.studiomangiameli.com/#!news

Our Favorite Chicago Restaurants

We’re both vegetarian, so this list is biased in favor of places with great veggie options:

Ras Dashen

This may be our favorite restaurant in the world, and it’s just down the street from us in Edgewater. Chef Zenash Beyenne is a magician with spices, and her richly flavored stews transcend the genre. There are many Ethiopian restaurants on this strip of Broadway, but after you go to Ras Dashen, it’s the only one you’ll need. Try the q’tegna appetizer and the dupa wat (spicy pumpkin stew).

Tweet

Located not far from us in Uptown, this is the best place for brunch in Chicago so expect to wait if you go during peak brunch times. But waiting isn’t so bad in Tweet’s adjacent bar, Big Chicks, with free coffee and a game of Boggle. And when you finally sit down, the enormous, beautifully plated portions of food are worth it. The menu has a lot of options for veg and vegan, and they even have a separate gluten-free menu if you need it. Our favorites are the veggie bisquits and gravy and the chilaquiles. Lots of fresh fruit, coffee cake, and every flavor of Tabasco sauce imaginable are all on hand to enhance your brunch experience.

El Norte

When we are feeling broke but really want to eat out, we go to El Norte, our neighborhood taqueria. The quality is good, it’s open late, and the price is right. My “the usual” is 1 order of beans, 1 order of corn tortillas, 1 order of sliced avocado, and some limes. I make my own tacos and eat dinner for about $3. When we visit our friends who moved from our neighborhood to Skokie, they often ask us to bring them veggie burritos from El Norte.

Ben’s Noodles and Rice

This is our neighborhood Thai place. It does all the standard Thai dishes well (we get the Pad See Eew and the Panang Curry), but what sets it apart is how incredibly friendly and warm the owners are. Even when we haven’t been in for a year, they remember us and ask us how we’ve been. If it’s in season, try their mango sticky rice for dessert.

Chicago Diner

This all veg restaurant has been around for almost 30 years, and they have my favorite sandwich – the radical reuben – and my favorite milk shake (the vegan peanut butter cookie dough, made with temptation soy ice cream.)

Spacca Napoli

Of all the Napoli-style thin crust pizza places that opened in the last several years, this is our favorite. And when I’m feeling cheesed out, I order a pizza with crumbled black truffles and a fried egg. It’s not on the menu, but if they have eggs in the kitchen and you ask nicely they’ll make it for you. The Bianco Nero is another great one, with porcini mushrooms and white truffle oil. Aaron likes the Bufalina. Also, it’s a great place to eat in the summer because they have a nice outdoor patio.

Crust

This is another thin-crust style pizza place we like (that also has good outdoor seating in the summer). This one’s specialty is that they are a certified organic restaurant (which we love to support). Plus, I love one of their salads (called the sun salad, I think) that has seaweed in it.

Blind Faith Cafe

This place is north of Chicago in Evanston, but is worth the trek for good veg entrees and more importantly, the best cake ever: their vegan chocolate peanut butter cake. We order a whole cake from them whenever one of us has a birthday.

Mana Food Bar

We only went here once, but it was awesome. Small plates of really interesting veggie food.

Conoce Mi Panamá

Who would have guessed that a storefront Panamanian place would have soy chicken or empanadas with fake ground beef?

El Faro

Another surprise – a taqueria at 31st and Pulaski that has an entire page of the menu devoted to tacos, tortas and platos of traditional Mexican dishes done with fake meat. The best is the fake Al pastor and carne asada.

Addendum on 2/18/12:

Quesadilla – La Reyna del Sur

Aaron and I just had dinner at another place that belongs on this list, now that it is trending toward a vegetarian-latin theme. Quesadilla – La Reyna del Sur on Western a couple blocks south of Fullerton. I don’t think they have a website, but you can get their info off of Happy Cow. Here’s a review of it on second city vegan. The quesadilla with vegan cheese and carne asada soya meat was the best. I am already wanting another one and I’m not even hungry.


Finer Points of Yogurting

In an earlier post I mentioned my yogurt making, but in case you are trying it yourself and want some tips on technique, here’s my step-by-step approach:

Equipment

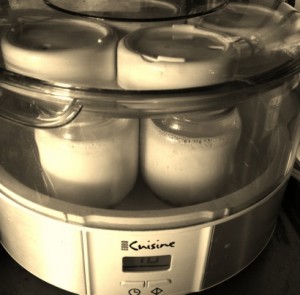
  •  Yogurt maker (mine is a Eurocuisine that holds 7 little glass jars) 
  • 2 qt double boiler sauce pan
  • Candy thermometer (mine is from Sur la table and has a range of 100-400° F)
  • Wire whisk
  • 4 qt sauce pan, big enough for you to set your 2 qt sauce pan down inside of it
  • Ladle and wide mouth funnel (I have a stainless steel set that came with a canning kit)

Ingredients

  • 1 qt whole milk
  • 1 packet of frieze dried yogurt starter (such as Yogourmet)

Step 1

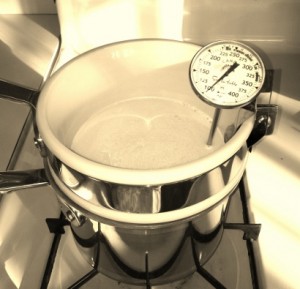
Fill the bottom of the double boiler with 2-3 inches of water, pour the milk into the top of the double boiler, and clip the thermometer to the edge of the pan to keep an eye on the temp. Use the wire whisk to stir the milk occasionally to avoid it forming a skin. (If it does, just skim it off with the whisk and throw it away.) Bring the milk to 175º F for a couple of minutes. (The reason for this is to kill off any unwanted bacteria so the yogurt will be the only bacteria growing in your milk. If you have a very trusted milk source, I’m told you can skip this step, but I never do.)

Double boiler with milk and thermometer 

Step 2

While your milk is heating, prep your 4 quart sauce pan by filling it about half full of cold water. This will be your bain-marie for quickly cooling the milk down to 120º F.

Step 3

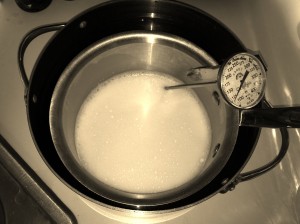
Take the top of your double boiler (with the milk) out of the bottom part. Pour out the boiling water. Transfer the thermometer to the side of the now-empty bottom part. Pour the milk into this and place it inside the 4 qt sauce pan bain-marie. (The reason I transfer the milk is that the top part of my double boiler is ceramic and takes a long time to cool. The bottom is stainless steel and cools quickly.) Watch the thermometer closely and take the pan with the milk out of the bain-marie when it gets to 120º F. This only takes 4-5 minutes, so don’t go start some other project.

Milk in the bain-marie

Step 4

While your milk is cooling in its bain-marie, prep your little glass jars so they are arranged open and ready on the counter. If you have my same yogurt maker, you can also use this time to prep the lids with the date (this is utterly optional) and set them in the top of the plastic lid of the yogurt maker (see photo below). Also, get out the ladle, wide mouth funnel, and packet of frieze-dried yogurt starter.

Step 5

Dip up a half-ladle of milk and pour in the yogurt starter powder. Use the whisk to mix it around in the ladle before pouring it back into the pan of milk. Now use the whisk to blend it thoroughly in the pan. Place your wide mouth funnel on top of your first little jar. Dip up an almost full ladle of milk and pour it into the jar through the funnel. Repeat to fill 6 of the jars. For the 7th, you just have to pick up the pan and pour the remaining milk into your funnel. The jars won’t be quite full since you only used a quart of milk (they are meant to hold 7 oz each, but you’ll only have a little under 5 oz per jar. If you want to fill them to the brim, you have to buy a 1/2 gallon of milk and use a little more than half of it, which then goes bad by the next time you make yogurt if like me you don’t use milk for anything else.)

Filling the jars

Step 6

Almost there! Just place your jars on the base of your yogurt maker and cover with the big clear plastic lid. Plug it in and set the time for as long as possible. I like to let it go 10-12 hours, but it will be fully yogurted after 8. When it finishes, you will need to open it up, put lids on your jars, and place them in the fridge. Let them set for at least 3 hours, then enjoy!

Yogur en marcha!

New Year’s on the Beach

A last minute dinner party turned out to be the perfect way to begin the new year. Just before midnight we headed out to Hollywood beach to celebrate with distant fireworks displays, mini international flags, and eating as many lucky grapes as possible in the first minute of 2012. 

Hearty Vegan Winter Stew

This recipe for “Deep December Ragout of Seitan, Shiitakes and Winter Vegetables” has been posted a lot on various sites, and the source is listed as: CHEF DU JOUR CRESCENT DRAGONWAGON SHOW #DJ9339. Here’s a link to it. I love it because it is really flavorful and hearty. All I do differently than the original recipe is I use my own homemade seitan instead of store-bought. And if you don’t have Umeboshi vinegar around you can sub red wine vinegar.

I’ve made it a few times  –  most recently for New Years’ Eve 2012. The leftovers are really good, since the flavors seem to deepen and melow over time.

DIY Yogurt and Granola breakfast

I can’t claim to be a full on urban homesteader, but I do have a breakfast routine that is almost all local ingredients, low on packaging, and homemade.

Every week I buy a quart of organic whole milk from the Dill Pickle Co-op in Logan Square. I like that it is in a glass jar that actually gets reused when you bring it back for your deposit! I make yogurt with my Eurocuisine yogurt maker and packets of yogurt starter from Yo-gourmet. The deal with making yogurt is that it takes a few times to figure out the process, but once you get it down, it really only takes about 30 min in the kitchen, and then just remembering to put the yogurt in the fridge when it finishes 8-10 hours later. (The longer you leave it, the tangy-er it gets. I love a 12 hour yogurt.) And then you have fresh yogurt from organic, local milk and no plastic waste!

Every two weeks or so, I make my own granola using a recipe that I got through my friend Liz, who adapted it from a Martha Stewart recipe. Check it out on Liz’s blog! For this recipe, I use organic oats from the bulk bin at Dill Pickle. The main building blocks are the oats, wheat germ (adds crunchiness), and the wet ingredients. For the fruit and nuts you can use whatever you have laying around. I’ve put raisins instead of cherries and various combos of pecans, pumpkin seeds, and sunflower seeds instead of almonds. I love the coconut shreds, but it comes out fine without them too.

For breakfast every day I pour one little jar of my yogurt into a bowl and top with about a 1/4 cup of granola. If I have bananas around, I slice half a banana on as well. Ok, that’s not local. But you gotta get your potassium.


Butternut Squash Soup

I made this soup for Thanksgiving this year. It is originally a vegan recipe I found on a couple of sites (click here for one of them). I made a few small adjustments (such as less stock in the beginning and buttermilk at the end) so I’ll re-post the recipe here.

Ingredients

  • 2 1/2 qts vegetable stock (10 C)
  • 4 lbs butternut squash (2 squashes should be about right, I don’t think it has to be exact)
  • 2 C carrots (diced – doesn’t have to be perfect – you’ll puree it later)
  • 2 C celery (diced)
  • 1 C onion (diced)
  • 1/2 C sherry (dry) (I accidentally used sherry vinegar the first time I made this – I thought it was good but it was pretty tangy. You’re better off with actual sherry or white wine)
  • 2 T olive oil
  • 2 t salt (use less if your stock is salted)
  • 1 bay leaf
  • 1 pinch white pepper (or more – pepper is yummy!)
  • 1/2 t nutmeg (freshly ground)
  • 1 T parsley (finely chopped)
  • 1/2 t paprika

Directions

Cut butternut squash in half lenghtwise and remove seeds, brush with olive oil.
Place squash cutside down on a parchment lined sheet pan and roast in a 350 degree oven for 40 minutes or until squash is soft to the touch, and the skin begins to pull away from the flesh. (this can take up to an hour if the squash is thick.)
Remove from oven and let cool.
Spoon roasted squash out of the skin and pass it through a ricer or food mill to remove any of the stringy fibers. I used a food mill because I have one and wanted to get more mileage out of it, but I think you could skip this step. You will blend everything later.
Heat olive oil in a large stockpot and swet the carrots, celery and onions, until the onions and carrots just start to caramelize.
Deglaze the pot with sherry.
Add the vegetable stock, salt, pepper, nutmeg and bay leaf and bring to a boil.
Add the squash, reduce to a simmer and cook for 45 minutes.
Remove the bay leaf, and puree the soup in the pot with an immersion blender until it reaches a smooth, creamy consistency.
Add 2 cups buttermilk (or less if you don’t have 2 cups. Not an exact science.)
Taste, and add salt and pepper if needed.
Garnish with chopped parsley and paprika and serve.

Phool

Every once in a while at an Indian restaurant you’ll see a dish called “Tandoori Vegetable” or “Tandoori Phool” (Phool = Cauliflower). If you do, order it. Especially if you’re at India House in Oakbrook, where they make an especially yummy version. I always assumed that I couldn’t make it without a Tandoor oven. It turns out that it can be made at home.

Our version is adapted from KhanaPakana.com’s recipe.

Ingredients

  • 1 head cauliflower
  • 1 big or two small stalks broccoli
  • Fresh lemon juice
    (at least 4-5 lemons’ worth, the more the better!)
  • 1 lemon for garnish
  • 2 T Chaat Masala
    (buy this at an Indian market, I like one called “Chunky Chaat Masala” from Patel Bros. on Devon in Chicago)
  • 1 C Gram Flour
    (aka chickpea/garbanzo flour, called “Besan” at the Indian market)
  • 2 T nutritional yeast (optional)
  • 1 T chili powder
    (I don’t think it matters what kind, cayenne should be fine)
  • 1 C plus 3 T water
  • pinch of salt
  • A lot of vegetable oil for frying
    (canola or other oil that says “refined for high heat”)

Directions

Break the cauliflower and broccoli into florets 2-3″ in diameter. Slice each floret in half. Mix the fresh lemon juice with the chaat masala. Put the cauliflower and broccoli florets in a gallon-sized ziplock bag and pour the lemon juice mix in over them. Marinate for at least 30 minutes, or up to a few days in the fridge.

Mix the gram flour, nutritional yeast (if you have it, no worries if you don’t), chili powder and salt in a bowl with a fork. Add the water and mix with the fork until all the flour clumps are broken up. You should have a sticky batter that will coat and stick to the cauliflower and broccoli florets.

Heat about 2 inches of oil in a deep frying pan or big sauce pan.

Dip the cauliflower florets into the batter, then drop into the oil (try to lay them on the flat side so they get submerged) and fry for about 1 min in the oil. You can put at least 6 florets in at a time, depending on the size of your pan. By the time you get to the broccoli, the batter may have gotten a little diluted from the marinade. Don’t worry, the broccoli does ok with a thinner batter.

As you fish out the fried florets with a slotted spoon, place them into a casserole dish.

Once they are all fried, bake for 10-15 minutes at 275° F.

Garnish with lemon wedges and serve.

Fun additions

Prep the casserole dish with bed of cooked white basmati rice, pour the remaining marinade over it, then arrange the fried florets on top of the rice and bake.

Tomato wedges and onion wedges can also be dipped in the batter, fried, and added to the casserole dish. They won’t hold the batter that well and it will get a little messy, but still very yummy.